Barcode Scanners Customer Displays Public Product List Product Requesting Scales
Email Accounts eCommerce Websites In Store Website
Pre Install Planning Creating a Franchise
Creating a Custom User Interface
PRELIMINARY INFORMATION. Feature not yet available for general use
You can create a custom user interface for PosGreen using HTML/Javascript technologies. This interface runs within the trading lane and does not require an active internet connection.
| User Interface / Screens | «-- What the user sees |
| HTML/Javascript Web Pages | «-- Subject of this document |
| PosGreen Retail Application | |
| Backend connections to servers etc |
Your interface only really needs to concern itself with the look and feel aspects, the PosGreen application will provide the information you request and implement business rules and security.
Notes
Your interface can be either an SPA (single page application) design or use multiple different HTML files.
You can use whatever client side tools you wish, such as JQuery, React etc.
User interfaces designed using the details on this page will also be useable as external web pages without directly running PosGreen. This feature isn't available yet though.
It is possible to have your initial page be a remote web page served from a web server if you wish, although we recommend you have a local htm file that calls this page. This ensures that starting the Pos does not display "page cannot be displayed" if the webserver or internet is unavailable.
Communicating to the Point of Sale
The Pos will call Javascript functions on your webpage when certain things occur. These functions need to exist as global scope and we reserve all names starting with 'PosDirect' for future expansion.
- PosDirect_AdviseEvent
-
Unsolicited messages about the things happening within the Pos. Messages that need to be displayed, hardware changes, etc.
function PosDirect_AdviseEvent(inStr) { var inObj = JSON.parse(inStr); // inObj contains the details and data of the system event // Your code goes here } - PosDirect_AdviseSale
-
Called when something about an active sale changes.
function PosDirect_AdviseSale(inStr) {
  var inObj = JSON.parse(inStr);  // inObj contains the details and data of the sale event
  // Your code goes here
}
Your scripts can call the Pos to perform actions by calling the following helper functions
- PosCommand
- Normal PosCommands as can be issued from other places within Fieldpine
- PosUICommand
- Commands that are more specific to the User Interface operation, typically providing functions that aren't directly in the PosCommand set of commands
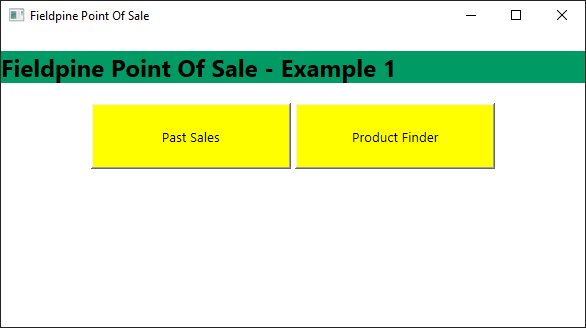
Example 1 - Simple menu page
This example shows a minimal Interface that displays a few buttons and calls the POS.
Step One
Copy and save the following html to a file called WebUI.htm inside your POS folder ( \Fieldpine\Pos )
<!DOCTYPE html>

<html lang="en" xmlns="http://www.w3.org/1999/xhtml">
<head>
            <meta charset="utf-8" />

            <title>WebUI Example 1</title>
            <style>
                * {
                    font-family: 'Lucida Sans', 'Lucida Sans Regular', 'Lucida Grande', 'Lucida Sans Unicode', Geneva, Verdana, sans-serif;
                    font-family: 'Segoe UI', Tahoma, Geneva, Verdana, sans-serif;
                }

                .abutton {
                    width: 15em;
                    height: 5em;
                    overflow: hidden;
                    max-width: 15em;
                    background-color: yellow;
                }
</style>
            <script>
        function PosCommand(Str) {
            // This function is provided by Fieldpine
            // Normally it is included in a seperate script, but to keep the example clean and clear
            // it has been inlined
            if (Str.length < 1) return;

            if (typeof window.external.PosCommand !== 'undefined') {
                var r = window.external.PosCommand(Str);
                //alert(r);
                return;
            }

            var n = sBaseUrl + "/posc/" + Str;

            var req = null;
            var bAlert = 1;

            if (window.XMLHttpRequest) req = new XMLHttpRequest();
            else if (window.ActiveXObject) req = new ActiveXObject("Microsoft.XMLHTTP");

            // 3rd param must be true, or system hangs
            req.open("POST", n, true);
            if (window.ActiveXObject) req.setRequestHeader("If-Modified-Since", "Sat, 1 Jan 2000 00:00:00 GMT");
            req.setRequestHeader("Content-Type", "application\\xml");

            req.onreadystatechange = function () {
                if (req.readyState == 4) {
                    if (req.status == 200) {
                        // Process reply if needed
                    }
                }

            };

            req.send(null);

        }
    </script>
</head>
<body style="margin:0">
            <div style="background-color:#009b64;width:100%"><h2>Fieldpine Point Of Sale - Example 1</h2></div>

            <div style="text-align:center">
            <input type="button" onclick="PosCommand('pastsales(go)'); return false;" class="abutton" value="Past Sales" />

            <input type="button" onclick="PosCommand('lookup(products)'); return false;" class="abutton" value="Product Finder" />

    </div>

</body>
</html>
Step Two
Start the POS and the following very simple screen should appear.
When you click either of the buttons, the standard default screen will be called and display. A later example will show how these can be customised too