 Library
Barcode Scanners Customer Displays Public Product List Product Requesting Scales
Email Accounts eCommerce Websites In Store Website
Pre Install Planning Creating a Franchise
Capturing Courier Tags
If your sale is going to be couriered to the customer rather than being a pickup, you might like to record the courier reference number against this sale. This can be automated so that the staff are prompted to scan the barcode when courier/freight is added to the sale.
If you are capturing courier tags there is a general purpose report under "Reports" to review them.
How to Setup
- Create a "Courier" Product if needed
-
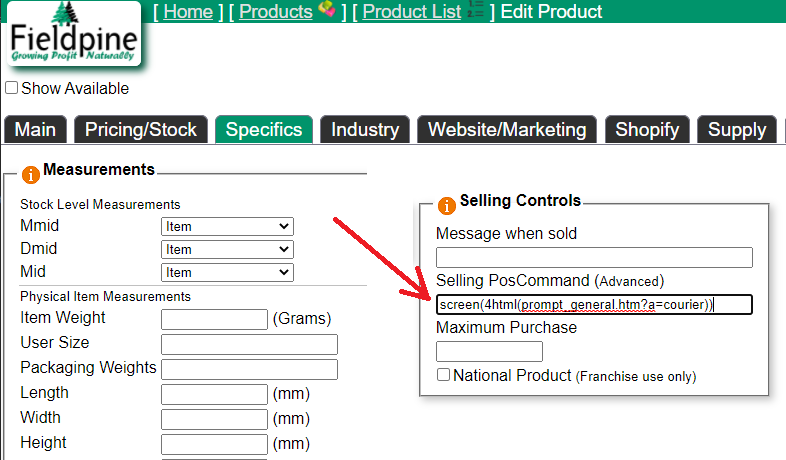
Edit the product definition. In the field "PosCommand" enter the following (tip cut and paste)
screen(4html(prompt_general.htm?a=courier))

-
When this product is sold, the POS will display a screen similar to the following, prompting the user to scan the courier tag

- If you have multiple courier or freight type products you can put repeat the above for each product.
- As an alternative, you can program a button with the same command "Screen" command as above. If you program a button like this, then the prompting is not automatic but triggered when the button is clicked.
- PosGreen version P2264 or higher is required to use this functionality
Configuring the Prompt Screen
Advanced The prompt screen that appears and is shown to the user is a web page. If you wish you can customise this screen with instructions or additional data capture.
- Copy the file prompt_general.htm to site_general.htm.
- Change the filename in the above command to site_general
- Edit the file site_general.htm with the changes you require. The Fieldpine version of this file is generic and may contain lots of extra logic that is unrelated and can be removed.